Learn in this article how to debug jhipster backend services with Eclipse.
There are many different options available how to do the debugging of the backend. In this tutorial it will be explained how to use maven and Eclipse to enable the debugging in IDE:
Debugging via Maven a spring-boot application in Eclipse
First we need to enable remote debugging for the java backend code. This can be done by passing parameters to maven command, we require:
- -Dspring-boot.run.jvmArguments
this is passing JVM arguments to the spring-boot startup - -Xdebug
enable debugging on JVM level - -DskipTests
skip tests of maven run - -Xrunjdwp:transport=dt_socket,server=y,suspend=y,address=5005
enable remote debugging on JVM and open port 5005 for the debugging
Putting all together we need to pass to maven
-Dspring-boot.run.jvmArguments=\"-Xdebug -DskipTests -Xrunjdwp:transport=dt_socket,server=y,suspend=y,address=5005\""
Prepare maven with External Tools
Go to you JHipster project and do following steps
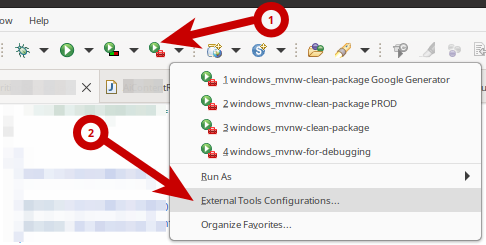
Expand External Tools and select External Tools Configurations…
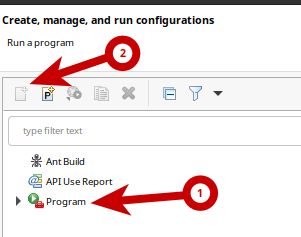
Now select Program and afterwards click on New launch configuration
Create now a new Launch Configuration with following values
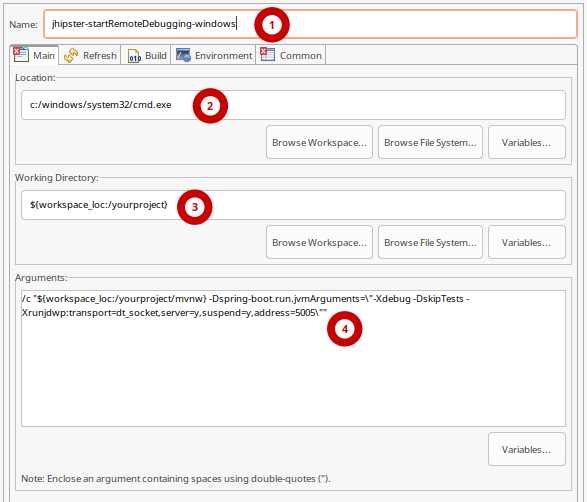
- Enter the Name
jhipster-startRemoteDebugging-windows
- Enter the Location
c:/windows/system32/cmd.exe
- Enter the Working Directory, replace yourproject with your project name
${workspace_loc:/yourproject}
- Enter the Arguments, replace yourproject with your project name
/c "${workspace_loc:/yourproject/mvnw} -Dspring-boot.run.jvmArguments=\"-Xdebug -DskipTests -Xrunjdwp:transport=dt_socket,server=y,suspend=y,address=5005\""
Now configure sharing
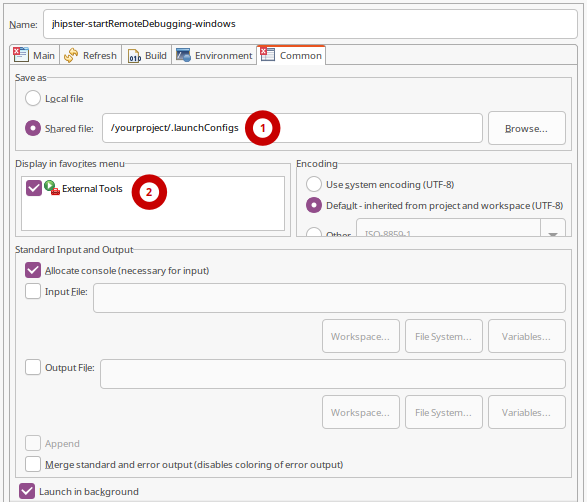
- Select Shared file and enter, replace yourproject with your project name
/yourproject/.launchConfigs
- Display in favorites menu
Check External Tools
Now run this configuration, which will start the maven default target
Configure Debugging in Eclipse via Remote Debugging
We now need to attach Eclipse to the above started spring-boot, which itself get started by maven
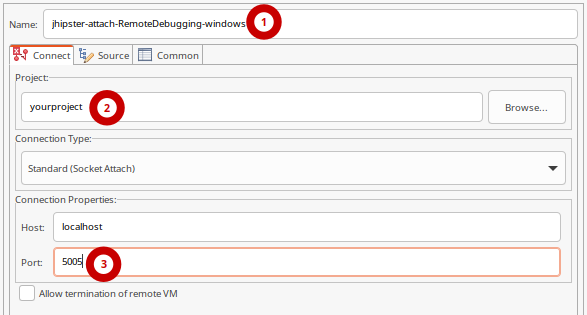
Configure Remote Debugging Settings
- Enter a Name for the Launch Configuration
jhipster-attach-RemoteDebugging-windows - Select your project
yourproject - Enter the port to attach to
5005
Configure sharing
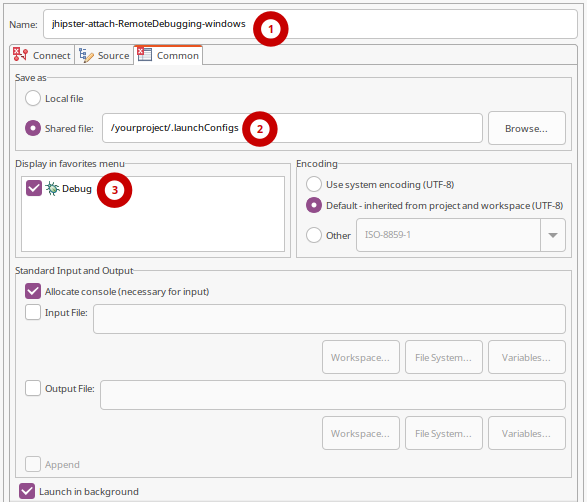
- Select Save as
Shared file and enter /yourproject/.launchConfigs - Display in favorites menu
check Debug
Attach to spring-boot debugging
Now we have prepared everything. If you have started before
jhipster-startRemoteDebugging-windows
Now the maven may already showing you that Spring-Boot is started and ready to connect. As soon as you have this report you can run
jhipster-attach-RemoteDebugging-windows
If everything went well, Eclipse will switch to the Debug Perspective and you can now place breakpoints and debug step by step through your code.

